By Judith on April 9, 2026 1 Comment (Leave comment)
After making a bright and scrappy Notebook Cover a while back for my friend’s birthday …….
I got a few requests for a tutorial!
So here is my Scrappy (Quarter Log Cabin) Notebook Cover Tutorial.
The tutorial will take you step by step through the ‘quarter log cabin’ piecing on the front, echo quilting, installing the flaps, lining, elastic pen holder and button/loop closure.
This is a great wee project for using up some of your favourite scraps, and they make perfect gifts for anyone you know who loves journalling, writing poetry, collecting recipes or writing lists!!!
You can of course quilt your notebook cover any way you choose. I went for some quick and easy echo quilting around these Art Gallery ‘Boho Fusions’ fabrics.
And of course, when your notebook is full, just pop in a new A5 Spiral Notebook and you’re off and running again!
By Judith on January 20, 2026 0 Comments (Leave comment)
February is the month of love, and no better way to celebrate than with a free patchwork heart tutorial!
I first created a placemat size Log Cabin Heart a few years ago for Patchwork & Quilting Magazine, when they asked their contributors to design a mini quilt that represented 3 favourite things.
For me it was Log Cabins (my first love in quilt blocks!), scraps (of course!) and the colour purple (my favourite colour since childhood!).
But now I can add a 4th favourite element - piecing!
I love piecing much more than quilting, and the thought of downsizing my Heart block (while dialing up the cuteness!) thrilled me no end!
So my free YouTube tutorial means you can choose from the large (original) size - which makes a 14″ square unfinished block, the medium size - which makes a 10″ square unfinished block and the baby of the family - which makes a 6.5″ square unfinished block.
Perfect for using even the smallest of prettiest scraps!
But of course, why stick with squares!!
You can turn your blocks into anything you like. How do you like my trio of mats, made with my favourite Tilda scraps and Essex Yarn Dyed Linen (Denim)?
The large size would be perfect as a table centre.
Or how about the medium one as a candle or potholder mat.
And the mini mat is the perfect coaster size for your co-ordinating mug!
At the risk of sounding like Goldilocks and her 3 bears, there’s a size perfect for everyone!!
I love cross-hatch quilting, and it’s the perfect design for ditching through the ‘logs’ of these hearts.
And despite having a drawer full of pretty pre-made bias bindings, I didn’t have just the right colour for my trio, so I made my own!!
I also made a little gift bag with the small size heart pieced into the front and another one on the back.
This is filled with goodies for my friend’s birthday!
So if you love piecing, log cabins or cute hearts as much as me, why not check out my free YouTube tutorial. A link to the accompanying PDF Cutting and Measurements chart is in the description.
By Judith on December 6, 2025 0 Comments (Leave comment)
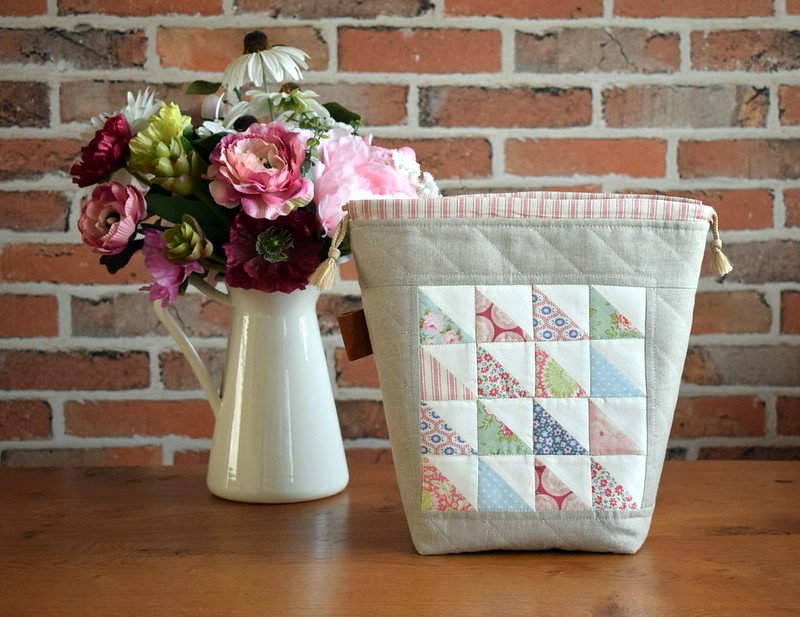
I recently made a load of Flying Geese from some Tilda scraps. These are going to be borders in a quilt I’m currently working on.
Because I was working from scraps, I couldn’t use the ‘No Waste’ method to make all of the geese. When making one ‘goose’ at a time, you trim off the corner fabrics as waste.
Never one to throw away even tiny pieces of delicious fabrics, I sewed them together to make the equivalent of HST (Half Square Triangle) units. They are only 2.25″ square unfinished!!
I already knew what I wanted to do with these cute HSTs!
I was inspired by a similar bag by @inghelhoe on Instagram who used similar orphan blocks to decorate her drawstring bags.
I had enough HSTs to make a block for the front and the back of the bag!
Lush Irish Linen works so well with the soft Tilda tones. I used more Tilda for the lining (Old Rose - Lucy Teal, avaialable here).
Some repurposed denim gives the bag a sturdy and structural base! And a little leather tab for that personal touch!!
The finished bag is 12″ by 11.5″ tall by 5.5″ deep, the perfect knitting or crochet project bag don’t you think!!
So the lesson of this practical bag is never throw away your favourite fabric offcuts!!! You just never know how a little creativity and sewing know-how can transform waste into wonderful!!
I originally designed and taught this Free Motion Embroidery hoop last year and had many requests for the pattern!
And then last Friday night I taught my Robin Hoop as a live Zoom Crafty Monkies workshop to 16 ladies! What a great time we had (and a very different teaching experience for me)!
So it was time Mr Robin was made available to the rest of the world in the form of a comprehensive step by step pattern!
The pattern includes notes on this fun and creative sketching technique including how to set up your machine for Free Motion Sketching.
This hoop is a little slice of textile art, perfect for using lots of little scraps! The background is a collage of low volume scraps which gives texture and the perfect backdrop for the brightly bondawebbed Robin scraps on top!
In true textile art style there are many ways you can embellish the composition, with vintage lace and trim, text (printed on tea stained paper or fabric), buttons, hand embroidery etc.
There is no end to fun you can have decorating and personalising your Robin hoop! And what a perfect gift for the many Robin lovers out there!
The pattern is available here, and is included in our 20% off Black Weekend Sale using code blackfriday20 (ends tonight).
By Judith on September 24, 2025 0 Comments (Leave comment)
This week in The Kindred Spirits QAL we have been making Grandmother’s Cross blocks:
These are 14″ finished blocks and are a variation on the Granny Square quilt block. You can read about the lovely meaning behind the Granny Square here.
There are many variations of Granny Square quilts (you can see my French General version here) but I was inspired this week to go miniature!
I’ve had a little stash of 1.5″ Denyse Schmidt squares languishing in a drawer for several years, so I thought I’d see how they made up into a mini Granny Square!
When I had one done I thought it was the perfect coaster size! So I made another 3! (And I still have some little squares left!). I do love small scale piecing!
These cuties finish up at 4.75″ square, the perfect size for your favourite coffee cup!
And I’ve written up a tutorial on how to make these Granny Square Coasters, which you can download here.
This was a great project for using up favourite small scraps and also leftover binding strips and offcuts of wadding!
Some were for my next free tutorial (remember my Scrappy Hexie Basket? Well I’ll be releasing the pattern for this one as a free tutorial very soon).
And some were just an excuse to have fun with teeny pieces of fabric!
These baskets are only 4.5″ and 6″ tall and are ‘improv. pieced’. This means your pieces of fabric aren’t pre-cut to a specific size, rather you just keep adding pieces until you have a section that can be joined to another section.
Improv. piecing for small projects is the perfect way to use up tiny pieces that are too small for English Paper Piecing or regular piecing patterns.
To give you a sense of scale, my smaller basket is holding large spools of 50wt Aurifil thread.
I create my baskets with an inset base with piping. I think the piping gives the basket more definition and shape.
And the structure is provided by the heavy sew-in vilene that the exterior is quilted on to.
I can think of a tonne of uses for these cute baskets, not least filled with goodies and gifted to loved ones!
Tune back soon to hear all about my free Hexie Basket YouTube Tutorial!
(And now there’s a mini tutorial on how to make these improv.pieced versions of my Hexie Baskets here.)
By Judith on April 29, 2026 0 Comments (Leave comment)
It seems like an age since we were last in class creating a holy mess with strips of fabric, wool fibres, thread and hospital bandages (don’t ask!!)!
We were well in the throws of making Textile Art Pictures, using a water soluble fabric technique for the background, and then building up a picture on top.
I’ve had a few finished photos sent to me of completed pictures, and they are pretty amazing!
Aren’t they fab! I love how each one is uniquely different, expressing favourite thoughts, colours, flowers and words.
I know this particular project was a real hit with some of my ladies, who had ideas and plans for several more pictures!
If you’d like to have a go at a similar technique, check out my free tutorial here on how to turn little scraps into applique shapes using water soluble fabric (available to purchase here).
And it’s soo lovely to see your scrappy pouches, made using my first YouTube tutorial.
Thank you everyone for sending me your pics! They bring a smile to my face!
By Judith on April 12, 2026 2 Comments (Leave comment)
As lockdown continues here, I’ve had lots more time to play with my favourite scraps!
I’ve been needing a little mat to place under the tray that sits on my oak table. I also love the process of making ‘stacked coins’ from scrappy strips.
So put the two together and what do you get? My free Scrappy Table Topper Tutorial!
The tutorial will take you through how to make the stacked coin columns - they can be any size you wish, maximising the size of scraps you have.
You will also see how to quilt the topper using a quilting bar - that weird looking ‘allen key’ type bar that languishes in your accessories tray! It’s a really handy little gadget, and will save you lots of marking out time!
I also show you how to make and finish off the binding by ‘stitching in the ditch’ from the front side.
This is a really quick little project, and you can make these pretty and functional mats any size you like! I now have several of them dotted around my house, bringing me joy each time my eye catches some of my favourite fabrics.
I hope you enjoy the tutorial. We are getting better with each one that we make, and we have more planned!
By Judith on April 6, 2026 2 Comments (Leave comment)
Hello everyone!
I hope you are all keeping safe and well during these strange days. With much more time available to us, I guess you are all making lots of headway with all your WIPs and UFOs!!!!! (wink, wink!)
With no classes to teach, I thought I’d have a go at teaching online!! With essential tech support from my daughter, we spent 6 days filming, editing, cringing, re-filming and editing some more to finally produce our first video tutorial!
It’s far from perfect and we still have lots to learn (not sure I’ll ever get used to seeing & hearing myself on video!), but we are really pleased overall and the initial feedback is positive.
So if you have lots of scraps you would like to turn into something practical and pretty, then our free tutorial might just be what you’re looking for!
Click on the pic and you’ll be taken to the tutorial on my Youtube Channel
These scrappy pouches can be made to any size, so you can cater for the scraps you have.
The strips are sewn down onto a foundation layer (either sew-in interlining, baking paper or wadding) and no matter the size of the pouch (or textile you use) the technique is the same.
I’ve made a cutesy pencil case size pouch ….
…. as well as medium sized project or toiletry pouches.
And then I went large with my denim scraps, making this extra-large pouch, perfect for a laptop, files or even a knitting project!!
The tutorial takes you step by step through making the strippy panels, creating zipper tabs, inserting the zipper and assembling and finishing the pouch.
And you also get the measurements for all the sizes shown here.
So with all this time on our hands, there’s really no excuse for not diminishing those scraps!
By Judith on March 16, 2026 4 Comments (Leave comment)
It’s been a while since I’ve posted here! Apologies!
Nothing to do with the current pandemic. I got creatively and mentally very tired after a busy first quarter, but I’m pleased to report that life is settling down for me (ironically, as Covid-19 causes chaos!) and I’m back at the sewing machine!
If you know me at all you will know my love of scraps and Tilda! Put them both together and you get lots of EPP (English Paper Piecing) projects using even the littlest pieces (see some past examples here and here)!
I had been keeping my precious Tilda scraps in an unattractive plastic bag!
But now look what I’m keeping them in!
These are 1″ hexies, hand stitched together and quilted onto heavy sew-in vilene, then magically turned into a cute basket to perfectly house my pretty scraps!
I wanted a defined cylindrical shape so added some piping to the base and narrow binding at the top.
I’m hoping you can’t see where the short sides of the panel are joined together to make the cylinder! With EPP, the shapes at opposite sides will slot together (like a jigsaw) so trim away the excess stabiliser before joining the hexies with some discreet whip or ladder stitches.
My chosen lining isn’t Tilda but a pretty Lecien floral. But as a lover of all things ‘ditsy’ I’m confident it blends beautifully with the Tilda prints.
Now, what will I make next with my favourite scraps!!
By Judith on December 1, 2025 2 Comments (Leave comment)
Yesterday was our Robin Hoop Art Workshop, and what ‘sketchy’ fun we all had!!
Nine ladies spent a glorious Saturday getting in touch with their artistic side.
They built up their low volume backgrounds, a little matchstick quilting and lacey additions before bondawebbing their scrappy robins and starting the sketching fun!
And just look at their awesome results ….
Aren’t they so cute!!
Well done ladies on your festive works of hoop art!
So that’s the last of our Saturday workshops for 2019! We will soon be releasing new classes and workshops for 2020 so stay tuned!
By Judith on May 17, 2026 2 Comments (Leave comment)
My youngest daughter requested a handmade gift for her friend’s 18th birthday.
Front
Back
So last bank holiday Monday, I had a happy afternoon ‘playing’ in my sewing room with my first love, denim!
Using only my smallest denim pieces, I used the ‘quilt as you go’ method to quilt the pieces directly onto some Pellon flex foam, leaving sections here and there for a little Boro style stitching!
I’m not a great hand stitcher, but I’m loving the current boro/kantha/sashiko stitching trend that is influencing the quilting community at the moment.
Originating from the Japanese ethos of ‘visible mending’ these stitches are meant to be seen, functional, and not necessarily perfect! Yes! My kind of hand stitching.
I always love working with denim, and completely fell in love with this little pouch as I discovered interesting seams, shades and textures among my scraps.
It was a sad and sweet moment handing over this pouch! Needless to say I didn’t even make a dent in my pile of scraps!
My appetite for making more ‘quilt as you go’ boro style denim projects is unabated, so I’ve decided to design a bag in the same style! #lovemyjob
Unfortunately I don’t have a pattern written up yet for this project, but I’m currently working on a new Denim Pouch Bag, so stay tuned for new ways to upcycle your denim.
By Judith on September 10, 2025 0 Comments (Leave comment)
Last Saturday was my 2nd Rope Bowl Workshop.
And I’m pleased to say this lot were just as productive as my first group of ladies!!
Once again the feedback from this workshop was a resounding success!
It gives me so much pleasure seeing proudly smiling faces going home with beautiful creations tucked under arms and invigorated inspiration for many future gifts!
Well done ladies!
Interest and enquiries for this workshop continue to grow, so I will be sure to schedule more in next year!
By Judith on August 5, 2025 0 Comments (Leave comment)
Hi there!
Yesterday we had a fun Scrap Busting Saturday up at the Mill.
The classroom was alive with scraps getting turned into beautiful bags, cushions and quilts! (You can read more about the projects being made here.)
Oh how satisfying it is to breath new life into unwanted or left-over fabrics!
And speaking of fabric rejuvenating!
No 2 The ’60’s Revival’ Tunic!
This is my hippy tunic (made using New Look pattern 6068), not hippy perhaps in style, but hippy because it is made from 100% unadulterated C.R.I.M.P.L.E.N.E!
Yes you heard right!
I LOVE CRIMPLENE!
I don’t even know where a love for this nasty nylon came from! I love it so much I’m thinking of starting a ‘bring back the housecoat’ revolution!
And I feel it’s only right that I tell you now, I HAVE MORE CRIMPLENE! What joy!
That’ll be a few more hippy tunics to add to collection then!
And see that mug there? That’s my new folksy mug! Isn’t it fab!
By Judith on July 5, 2026 4 Comments (Leave comment)
This is my Autumn Rail Fence Quilt (as featured in August ’17 issue of Pretty Patches magazine).
If, like me, you have a healthy supply of scraps, then this is a great scrap buster project for you!
In August I am hosting a Scrap Buster Saturday, and this is one of the many quick and easy ideas folks can use to dig in to those overflowing scrap boxes!
Here’s how to make the Scrappy Rail Fence Block (12.5″ unfinished):
1 You will need a variety of scrappy strips, at least 13″ long and of varying widths (don’t go wider than 3″). Press them and make sure they have straight parallel sides. Don’t worry about trimming the lengths, you get a more accurate block if you leave the trimming to the end.
2 I went for a ‘late summer’ colour theme of teals, oranges, pinks and golds. But you could easily use whatever colours you have for a more ‘random’ rail fence.
3 You will notice I have included a brown striped fabric at the edge of each block. These strips are cut 2″ wide and give a little uniformity to the scrappiness of the blocks. If you are going for random and bright colours, try a narrow black and white stripe here.
4 If you are working to a colour theme, try to get an even number of colours per block. The order doesn’t matter, just sew enough together using a 1/4″ seam, not forgetting the stripey fabric on the end, until you can get at least 12.5″ wide. Set the seams (pressing the seam as you have sewn it) before pressing the seams to the darkest fabric.
5 Trim the block to 12.5″ square. If there is excess on the width make sure you don’t take any off the stripey/end fabric. You want these end strips to be of uniform width. I used my 12.5″ square ruler for easy trimming, but you can trim these blocks to any size, just make sure they are square!
6 Make lots more blocks until you have enough for your quilt (or until you have used up all your scraps!). I laid out my blocks in a 5 x 6 formation (5 blocks across by 6 rows down) alternating the direction of every other block to achieve the rail fence design. Join the blocks right sides together in rows and press the seams of each row in alternate directions. Join the rows together making sure to butt/nest the intersecting seams.
7 Spray baste your quilt top, wadding and backing (Spray basting tutorial available here) before quilting as desired (I quilted in a free motion meander all over). Trim off the excess wadding and backing and attach the quilt binding (tutorial available here).
Now you’ll always be warm and toasty on chilly Autumn evenings!
How is your week going? We are (still) basking in the most gorgeous sunny weather here, leaving us with stunning, glorious sunsets!
This week in my classes I am presenting my summer Saturday Workshops. The 4 Saturdays in August will all be workshops, and I will be posting about them here, starting with ……
If you’ve been sewing for any length of time, you may have a huge healthy stock of scraps, leftovers from previous quilting projects. These pieces might just be too sizeable, pretty or meaningful to throw away, leftover binding or jelly roll strips, or perhaps frugality gets the better of you!
Either way, there are many, many ways to put those ever growing scraps to good use!
Here are just a few examples of what you can make on Scrap Buster Saturday.
This is another example of grouping scraps into colourways. The French Braid piecing technique is super easy, and you don’t even need the pieces to be of equal width.
I’ve quilted the bag exterior onto bosal (flex foam) which gives it lovely texture and structure without losing softness.
(Hinged Faux Leather Handles available at the workshop)
My technique for making strip pieced blocks doesn’t involve a foundation layer.
I added a little ‘organisation’ to lots of random strips by making the central strip in each block white. The white strips are of uniform width, but that’s were the uniformity ends! All other strips are random widths and lengths. I even used ‘ugly’ fabrics I still had, but I totally love the finished quilt! That’s the magic of using scraps.
Autumn Rail Fence Quilt(block tutorial available here)
The simple sewing together of strips means you can easily make up this quilt top in a day.
Once again, I dove into my scrap drawers for specific colours - golds, oranges, pinks and teals, all of different widths and lengths. Some donated yardage of a brown stripe gives flow and order to the scraps.
But equally, this quilt would look fabulous made in random coloured scraps with a uniform ‘fence’ fabric.
‘Quilt As You Go’ Handbag: (pattern available here)
Here’s another roomy handbag idea for all those colourful scraps!
This ‘quilt as you go’ method involves the quilting of each individual piece of fabric onto a larger piece of wadding. There are no raw edges, and the condense quilting gives the bag lots of structure.
The pattern also includes this secure recessed zipper closure.
‘Birch’ Quilt (in progress):
I took inspiration from this quilt and decided to make a grey and low volume version (given that I have an overflowing drawer of LV scraps!).
I plan on using up my stash of Kona Greys to make this into a bigger ‘man’ quilt. Somehow, I think it will take me a lot longer to use up my LV scraps!
So there you have it! A little inspiration on how to use your scraps, and a date for your diary on how to have a day of fun turning them into something wonderful!
And if you need even more inspiration, check out my Scrap Busting Pinterest Board!
All Saturday workshops are £30, including a non-refundable deposit of £15 to register. Just drop me an email to to book a place.
By Judith on April 22, 2026 1 Comment (Leave comment)
I promised to post this week about the projects on my ‘Spring into Summer’ Table.
Never one to break a promise, I’m starting with my Denim Applique Sailboat Cushion.
I originally designed this cushion for a summer edition of Pretty Patches Magazine.
I loved re-purposing some denim and scraps for this nautical cushion. My recent discovery of Aurifil 12wt wool thread also made a significant contribution! You can read more about my designing process here.
The great news is that I’ll be teaching a workshop on this cushion on Saturday 19th May at my classroom in Conway Mill.
And not only that, kits will be available with everything you need to make the cushion, including lush Essex Yarn Dyed Linen, denim pieces, stripey binding and a bright red button for the back!
How cool is that!
So if you would like to spend a fun Saturday with other like minded creatives learning new skills like appli-quilting and free motion sketching, then just drop me an email to register:
By Judith on November 29, 2025 1 Comment (Leave comment)
It’s getting much colder here! Brrrrr! Winter has most definitely arrived!
And it’s getting harder to photograph my projects outside - icy showers are never too far away!
24″ x 15″
For a while now I have been wanting to make Lillyella’s Take Wing Butterfly pattern.
Butterflies hold symbolic meaning for me, and when I first saw Nicole’s Take Wing Butterfly, it took my breath away!
The butterfly is foundation paper pieced in 5 sections. I LOVE foundation piecing because of the crisp, sharp points and lines you get from this technique.
And Nicole includes a really helpful colouring sheet, so you can colour in the sections of your butterfly first to get an idea of colour and fabric placement.
The fabrics I used were mostly Sunprints by Alison Glass, leftovers from a rainbow quilt I made in the summer.
Most of the pieced sections are small, so this would also be a great scrap-buster project. And if you don’t fancy a wallhanging, it can easily be transformed into a beautiful cushion.
I will be teaching this next term as part of my new program of classes. I do hope you can join us for some foundation piecing fun!
By Judith on November 5, 2025 1 Comment (Leave comment)
Happy Sunday to you all!
I had a lovely, relaxing day today. And that included some fun sewing time!
These cute little apples are from the genius creativity of Kim Kruzich aka Retro Mama.
She designs the cutest patterns, and her book is called ‘Scrap Happy Sewing’ - ahhhh, a girl after my own heart!
I’d seen these adorable apples (& pears) on Instagram, and found the pattern in Retro Mama’s Etsy shop.
There are 2 sizes included in the pattern. I’ve made the ‘ornament’ size, finishing at only 3.75″ tall (including stem). The larger ‘pincushion’ apple finishes at 4.5″ tall (including stem).
I made these all from small scraps, and the smallest pieces of felt. It took longer to blanket stitch the stem and leaves than it did to sew up the apples!
It’s a really clever pattern - just look at those dimply bottoms!
As a pattern writer, I appreciate and enjoy using a well written pattern, especially when it produces the same results as the picture (wish I could say the same for my baking!!).
So if you need a new pincushion, teacher’s gift, or an adorable apple ornament, then this is the pattern for you!
By Judith on November 3, 2025 2 Comments (Leave comment)
Hello my friends!
Happy November to you all! Aren’t the weeks just flying in!
There have been a few exciting developments in the Hollies Household, which I will be able to tell you all about in 2 weeks time (can’t wait!!).
In the meantime, I can tell you about a quilt I made earlier in the year, which was featured in the September issue of Quilt Now (apologies for the late posting).
This is another scrap-busting project, using medium to low volume prints which have a ‘vintagey’ vibe (‘volume’ refers to the ‘loudness’ or brightness of the fabric).
I had a ball dipping in and out of my scraps drawers, using wee pieces, leftover jelly roll strips and scraps of vintage sheets.
And if you look closely, you’ll discover little snippets of vintage embroidery, lace and trim!
This improvisational style of piecing is quite addictive! You just start with a few small pieces, keep adding and trimming as you go, and before you know it, your scraps have grown into a sizeable panel.
I got so carried away that I made too many sections! Not wanting to waste them, I sewed them altogether and used them as a central panel in the back, pieced between 2 vintage sheets!
Even the binding is another vintage sheet!
I appreciate that maintaining a healthy ‘scrap stash’ takes organisation and space, but here are a few advantages you get from it:
You can make an entire quilt using just scraps!
Make your scraps go further using yardage for the background.
Enjoy the satisfaction & frugality of turning leftovers into many wonderful and new projects.
Put them to good use in charity bee blocks, like Bee Blessed.
Use scraps to ‘test’ blocks or measurements when resizing a block
I’m sure you can think of lots more advantages to keeping your fabric leftovers. And you can be even more creative thinking up genius ways to store them!
Despite this being a sizeable quilt (72″ x 82.5″) I wish I could tell you I made a significant dent in my scraps stash making it!!
But that just means I have lots of lovely gems waiting for another chance to be transformed!
By Judith on October 16, 2025 2 Comments (Leave comment)
Hello everyone!
I hope you are all safe after storm Ophelia made her presence known here today! Perhaps you got to stay inside and sew!
Yesterday I had a little free time and got to play with some scraps.
I define scraps as leftovers from another project. These Tilda strips were the leftover cuts from a quilt I made recently. Waaaaay to pretty to chuck!
I had no real plan, other than my need for a couple of mats for my new kitchen.
There’s something so satisfying about sewing strips together and just seeing where they take you.
A little addition of Essex Yarn Dyed Linen (Flax) and ‘Oven Glove’ wadding turned this mat into a trivet style hot pad. I love the texture the extra thick wadding gives when quilted!
With the leftover strips I had pieced, I just quilted them in the same way with standard wadding and voila! I now have a handy mat for my Tea, Coffee and Sugar canisters to sit on.
Oh and there’s one more to show you!
I turned a little EPP (English Paper Piecing) class sample into another hot mat (there’s oven glove wadding inside this one too!).
A mixture of Tilda and non-Tilda scraps in this one, on a background of more Essex Yarn Dyed Linen (Flax).
So now I have a choice of pretty mats to choose from!