Back in the summer, I made the momentus decision to make myself a quilt! In the 15+ years I've been quilting I've never made a quilt just.for.me!! I know, right!!
Now of course I have boxes and boxes of quilts that are class samples, made to demonstrate techniques or used in magazine publications. And I've several Brit Bee quilts that I love, but these were each made by 12 people as part of our quilting bee!
But I've never really given myself the time to think and dream about a quilt just for me! So this year when I had a little time, I came across 2 patterns I really liked the look of, and instead of trying to choose between the 2, I decided to make them both!!
Little Miss Sawtooth Quilt:
Pattern available here

My friend Di @willowbeckdesigns had made this quilt and it was on the bed I slept in when I visited her in July. I immediately fell in love with the scrappy low volume background and the beautiful warm yellows and soft corals Di had chosen to show off the varied sawtooth blocks.
I also loved the fact that this was a 'striking yet simple' quilt to make!! Win, win!!
So I selected scraps and fat quarters that fulfilled a loose 1930's retro vibe and had a tonne of fun making a different block every day!
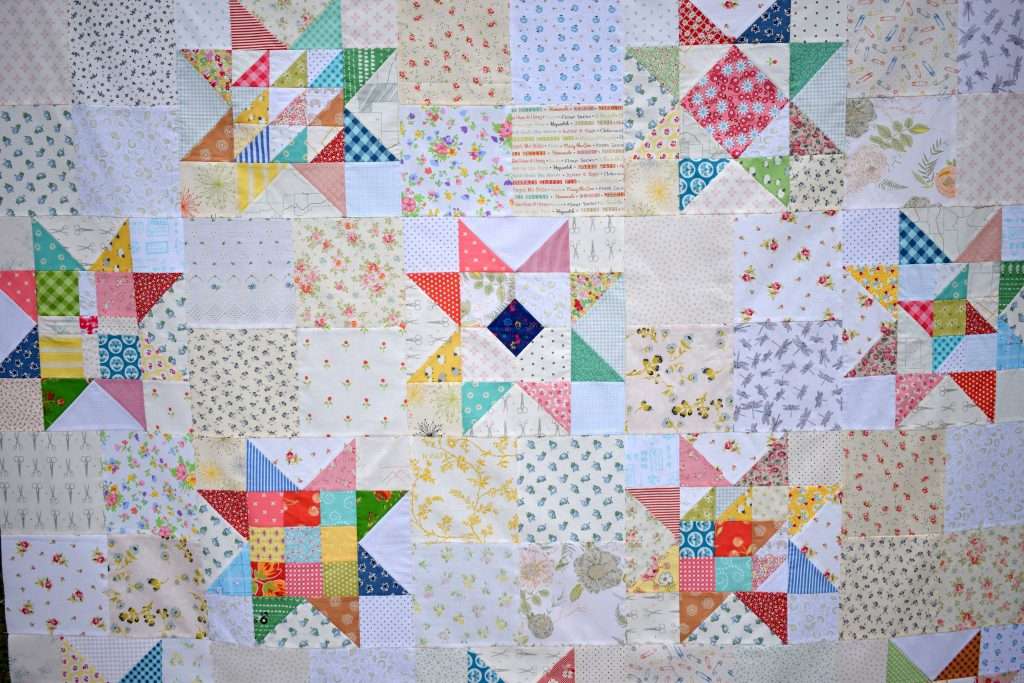
I was really pleased to be able to incorporate some low volume vintage sheets into the background.
It took no time at all to make the blocks and get the flimsy finished!
I recently got the quilt basted and backed and my plan is to do some machine quilting to secure the layers before 'big stitch' hand quilting in navy Perle cotton around each star! The hand-quilting of a quilt will be another first for me!

This is a really well laid out pattern and very easy to follow! I highly recommend it!
Orla Quilt:
Pattern available here

In thinking about which quilt patterns to choose, I fancied incorporating some simple hand applique, therapeutic hand sewing I could do in the evenings in front of the TV, while I was taking a break from packing up my house!
And the Orla quilt pattern fulfilled the brief perfectly!

Again this is a scrappy friendly quilt pattern (my favourite!). Each larger block is made up 4 'flower' mini blocks. The petals are hand appliqued onto low volume background squares which surround a centre square. I had fun using some of my authentically retro fabrics here!
When the blocks are assembled the leaves can then be hand appliqued in place.
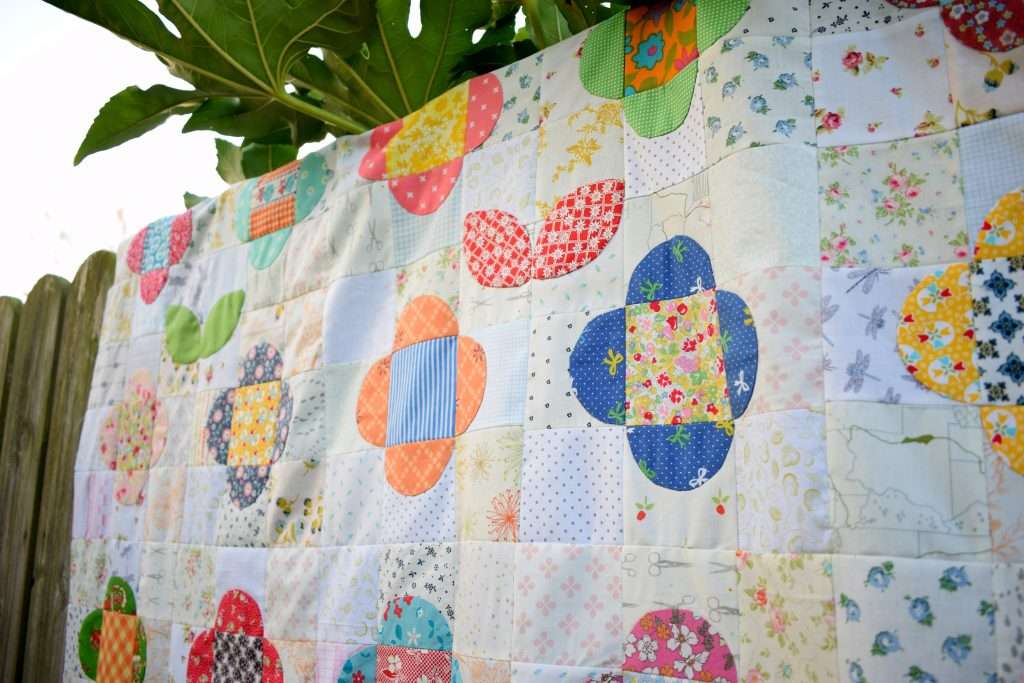
Now I didn't stick to the traditional needleturn technique here! In the original pattern, a 9 patch mini block is machine pieced before hand appliquing the petals in place. This means both the curved and straight edges of each petal are needleturned.
I wasn't confident I could achieve a consistently smooth curve with my needleturn, so here's what I did instead:
1 Make a cardboard template of the petal shape provided by the pattern adding an extra 1/4" to the bottom/straight edge.
2 Cut out the fabric an extra 1/4" bigger than the template (around the curved edge only)
3 Hand sew a running/tacking stitch around the curved edge only (make sure there's a big knot at one end and a good length of thread at the other!)
4 At the ironing board place the cardboard template on the wrong side of the petal fabric, centred & with straight edges aligned
5 Gently pull on the running stitch thread until the fabric on the curved edge gathers neatly around the cardboard
6 Hold the thread secure as you iron both sides of the fabric (a little steam is helpful here!)
7 Carefully remove the cardboard template (don't remove the running stitch) and press again
8 Pin the petal onto the right side of a background square, aligning the bottom raw edge of the petal to an edge of the square. You should have 1/4" of background square showing either side of the petal. Tuck the tacking thread in behind the petal.
9 Hand applique around the curved edge of the petal using an invisible applique stitch (no need to needleturn the fabric here as the edge is already turned under). Leave the straight edge of the petal raw.
10 Assemble the mini block as a 9 patch block, using 4 petal squares, 4 background squares and a contrasting centre square.
11 Machine piece the mini block using 1/4" seam allowance.

I found this technique gave me a much smoother curve on my petals and made the applique stage much simpler. Plus it reduced the amount of hand sewing so I could get the mini blocks pieced quickly and put up on the design board to determine the bigger blocks.
And I did the leaves in the same way, making a cardboard template of the leaf shape, cutting the fabric 1/4" bigger all the way around and drawing in the edges using a tacking stitch.
When my box of vintage sheets comes out of storage (when I can eventually move into my new home!) I plan to back and baste this quilt and again do some big stitch hand quilting using white Perle cotton. A perfect project for cosy winter evenings by the fire!!
This is another beautiful pattern I would highly recommend, with several size options to choose from.
I hope one day, in the not too distant future, I can get my first 'me quilts' finished and put to good use in my new home!
Happy quilting!


I love the appliqué quilt. Another one to add to my list.
Both tops are beautiful!
Thanks lovely! xo